Sometimes I’ll use one of the pre-built Genesis themes from StudioPress to give me a head start on a project. While I’ll almost always rebuild the code, their designs are minimal, attractive, and place focus on the website content ahead of flashy features and code bloat. They give a solid base to work from.
Because they don’t include development files I usually spend some time adding Gulp support to the theme, converting the theme to SCSS, and updating all of the JS files so they’re concatenated and minified.
What are the benefits of converting an existing theme to use Gulp WP Toolkit?
If you want to build on an existing theme and customize it, Gulp WP Toolkit will take care of all the mundane tasks that would otherwise require your time and effort. It will add browser prefixes to your CSS output, it will convert pixel values to REMs, it will generate an updated translation .pot file for your theme, it will optimize your theme images, concatenate and minify your JavaScript files, and also has linting tools built in so you can check on code quality as you go.
Being comfortable on the command line
The requirements to get started with Gulp WP Toolkit are a command-line tool (Terminal on Mac, or I like to use Cmder on Windows) and having Node and Gulp installed and accessible. Check your version by running node -v and gulp -v from the command line.
- If you need to install Node, you can do so by downloading the installer from https://nodejs.org/en/download/.
- Once Node is installed, you can install Gulp globally by typing
npm install -g gulpin your command line.
Adding Gulp WP Toolkit to the Infinity Pro theme.

While this guide is specific to the Infinity Pro theme, the same principles will apply to most other StudioPress themes.
1. Add a package.json file and run npm install.
Your package.json file can be quite basic, it only needs the minimum amount of detail to get started. You’ll see that I’ve also added the gulp-stats package, which records the length of time each task takes to run, and the order in which they complete and reports back when your build process finishes.
1{2 "name": "infinity-pro",3 "version": "1.1.3",4 "devDependencies": {5 "gulp": "^3.9.1",6 "gulp-wp-toolkit": "^2.2.1",7 "gulp-stats": "^0.0.4"8 }9}Run npm install once your package.json file is in place, and our depedencies will be downloaded to a new node_modules folder. If you’re using version control to track changes to the theme you’ll want to ignore this folder.
2. Create your Gulpfile.js.
If you’ve used Gulp before, you’ve probably had experience of Gulpfiles that span hundreds of lines of code. With Gulp WP Toolkit, things are much simpler. All of the tasks you’d expect are present, but they’re contained within the toolkit itself and you don’t need a monstrous Gulpfile to make use of them. At the moment, just having installed Gulp WP Toolkit, our Gulpfile is basic.
1'use strict';2 3var gulp = require('gulp'),4 toolkit = require('gulp-wp-toolkit');5 6require('gulp-stats')(gulp);7 8toolkit.extendConfig( /* Gulp config overrides. */ );9toolkit.extendTasks(gulp, /* Gulp task overrides. */ );As we configure Gulp WP Toolkit to work with the Infinity Pro theme we’ll update the configuration by adding to toolkit.extendConfig().
3. Copy theme assets to a /develop directory.
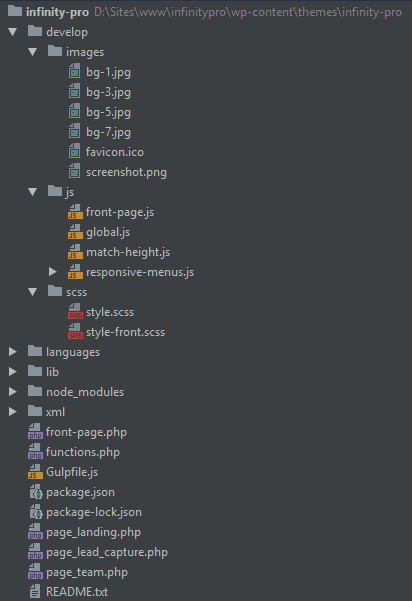
I want to keep my original files separate from my compiled production files, so I create a directory called /develop and place SCSS files, original images and source JS files there. These are the source files for my project. In the case of the Infinity Pro theme, I’ve moved the images, css and js folders inside /develop. I’ve also moved the theme screenshot.png file into the /develop/images folder.
When I run gulp build, Gulp WP Toolkit is going to find our images folder automatically and will optimize and output the images into an images folder in the theme root. The theme screenshot will also be optimized and moved to the right place. In order to correctly compile our CSS and JS files, we’ll need to set the correct input paths in our Gulpfile.js. I’ve also taken this opportunity to rename the CSS files and folder to SCSS, so we have develop/scss/style.scss and develop/scss/style-front.scss. Their contents will remain the same for now, though.
4. Set up SCSS output.
The first setup task we need to complete is to remove the theme header from our style.scss file and add it to the theme configuration in our Gulpfile. When complete, the Gulpfile.js should look like this:
1'use strict'; 2 3var gulp = require('gulp'), 4 toolkit = require('gulp-wp-toolkit'); 5 6require('gulp-stats')(gulp); 7 8toolkit.extendConfig({ 9 theme: {10 name: "Infinity Pro",11 homepage: "http://my.studiopress.com/themes/infinity/",12 description: "This is the Infinity Pro theme created for the Genesis Framework.",13 author: "StudioPress",14 authoruri: "http://www.studiopress.com/",15 version: "1.1.3",16 tags: "one-column, two-columns, left-sidebar, right-sidebar, accessibility-ready, custom-background, custom-colors, custom-header, custom-menu, e-commerce, featured-images, footer-widgets, full-width-template, sticky-post, theme-options, threaded-comments, translation-ready",17 template: "genesis",18 license: "GPL-2.0+",19 licenceuri: "http://www.gnu.org/licenses/gpl-2.0.html",20 textdomain: "infinity-pro"21 }22});23toolkit.extendTasks(gulp, /* Gulp task overrides. */);* Sidenote: While compiling this post I realised that Gulp WP Toolkit doesn’t account for a Template Version in the stylesheet header. I’ll add that to the toolkit, and update this tutorial when it’s done.
Gulp WP Toolkit will automatically identify our style.scss file, and compile and output it to the theme root, but we will need to add our own configuration for the style-front.scss file. We need to set our output filename, and the source and destination paths. The updated config should look like:
1'use strict'; 2 3var gulp = require('gulp'), 4 toolkit = require('gulp-wp-toolkit'); 5 6require('gulp-stats')(gulp); 7 8toolkit.extendConfig({ 9 theme: {10 name: "Infinity Pro",11 homepage: "http://my.studiopress.com/themes/infinity/",12 description: "This is the Infinity Pro theme created for the Genesis Framework.",13 author: "StudioPress",14 authoruri: "http://www.studiopress.com/",15 version: "1.1.3",16 tags: "one-column, two-columns, left-sidebar, right-sidebar, accessibility-ready, custom-background, custom-colors, custom-header, custom-menu, e-commerce, featured-images, footer-widgets, full-width-template, sticky-post, theme-options, threaded-comments, translation-ready",17 template: "genesis",18 license: "GPL-2.0+",19 licenceuri: "http://www.gnu.org/licenses/gpl-2.0.html",20 textdomain: "infinity-pro"21 },22 css: {23 scss: {24 'style-front': {25 src: 'develop/scss/style-front.scss',26 dest: 'css/'27 }28 }29 }30});31 32toolkit.extendTasks(gulp, /* Gulp task overrides. */);5. Set up JS output.
The last thing we need to set up is to make sure that all of the JavaScript files are outputting in the right places. At the moment, we’ve moved them into a new directory at /develop/js but they’re not being compiled because Gulp WP Toolkit doesn’t know about them.
From reading the Infinity Pro functions.php file, I can see that the files global.js, match-height.js and responsive-menus.js are loaded on every page, so it makes sense to concatenate these files into a single infinity-pro.js file. We will need to update the functions.php files to reflect this change, though.
Specifically, we will need to remove calls to the individual files and replace them with the single file. We’ll also need to update the wp_localize_script block which passes data to the responsive menu script, as the handle will likely now be incorrect.
Our updated Gulpfile.js should read as:
1'use strict'; 2 3var gulp = require('gulp'), 4 toolkit = require('gulp-wp-toolkit'); 5 6require('gulp-stats')(gulp); 7 8toolkit.extendConfig({ 9 theme: {10 name: "Infinity Pro",11 homepage: "http://my.studiopress.com/themes/infinity/",12 description: "This is the Infinity Pro theme created for the Genesis Framework.",13 author: "StudioPress",14 authoruri: "http://www.studiopress.com/",15 version: "1.1.3",16 tags: "one-column, two-columns, left-sidebar, right-sidebar, accessibility-ready, custom-background, custom-colors, custom-header, custom-menu, e-commerce, featured-images, footer-widgets, full-width-template, sticky-post, theme-options, threaded-comments, translation-ready",17 template: "genesis",18 license: "GPL-2.0+",19 licenceuri: "http://www.gnu.org/licenses/gpl-2.0.html",20 textdomain: "infinity-pro"21 },22 css: {23 scss: {24 'style-front': {25 src: 'develop/scss/style-front.scss',26 dest: 'css/'27 }28 }29 },30 js: {31 'infinity-pro': [32 'develop/js/responsive-menus.js',33 'develop/js/match-height.js',34 'develop/js/global.js'35 ],36 'front-page': [37 'develop/js/front-page.js'38 ]39 }40});41 42toolkit.extendTasks(gulp, /* Gulp task overrides. */);And in our functions.php file we can remove the now unnecessary script calls for the individual files, and instead change the infinity_enqueue_scripts_styles function to read:
1add_action( 'wp_enqueue_scripts', 'infinity_enqueue_scripts_styles' ); 2/** 3 * Enqueues scripts and styles. 4 * 5 * @return void 6 */ 7function infinity_enqueue_scripts_styles() { 8 9 wp_enqueue_style( 'infinity-fonts', '//fonts.googleapis.com/css?family=Cormorant+Garamond:400,400i,700|Raleway:700', array(), CHILD_THEME_VERSION );10 wp_enqueue_style( 'infinity-ionicons', '//code.ionicframework.com/ionicons/2.0.1/css/ionicons.min.css', array(), CHILD_THEME_VERSION );11 12 $suffix = ( defined( 'SCRIPT_DEBUG' ) && SCRIPT_DEBUG ) ? '' : '.min';13 wp_enqueue_script( 'infinity-pro', get_stylesheet_directory_uri() . '/js/infinity-pro' . $suffix . '.js', array( 'jquery' ), CHILD_THEME_VERSION, true );14 wp_localize_script(15 'infinity-pro',16 'genesis_responsive_menu',17 infinity_responsive_menu_settings()18 );19}6. Build the theme, and continue to develop.
With all of the above setup and configuration in place, we can run gulp build at our command line. This tells Gulp that we’re ready to compile all of our assets. Gulp WP Toolkit will log key events in your terminal app and will notify you when the build process is complete. All being well, we should still have a fully functional Infinity Pro theme, with assets now optimized, compiled, concatenated and more by Gulp WP Toolkit.
At this point, you probably want to continue on with customizations. If you’re working locally then you can use the power of Browser Sync to live-reload your web browser when you make changes to PHP, CSS or JS files in your editor. Setting this up requires a little more configuration, only three lines. Added to your Gulpfile, the finished article should look like:
1'use strict'; 2 3var gulp = require('gulp'), 4 toolkit = require('gulp-wp-toolkit'); 5 6require('gulp-stats')(gulp); 7 8toolkit.extendConfig({ 9 theme: {10 name: "Infinity Pro",11 homepage: "http://my.studiopress.com/themes/infinity/",12 description: "This is the Infinity Pro theme created for the Genesis Framework.",13 author: "StudioPress",14 authoruri: "http://www.studiopress.com/",15 version: "1.1.3",16 tags: "one-column, two-columns, left-sidebar, right-sidebar, accessibility-ready, custom-background, custom-colors, custom-header, custom-menu, e-commerce, featured-images, footer-widgets, full-width-template, sticky-post, theme-options, threaded-comments, translation-ready",17 template: "genesis",18 license: "GPL-2.0+",19 licenceuri: "http://www.gnu.org/licenses/gpl-2.0.html",20 textdomain: "infinity-pro"21 },22 css: {23 scss: {24 'style-front': {25 src: 'develop/scss/style-front.scss',26 dest: 'css/'27 }28 }29 },30 js: {31 'infinity-pro': [32 'develop/js/responsive-menus.js',33 'develop/js/match-height.js',34 'develop/js/global.js'35 ],36 'front-page': [37 'develop/js/front-page.js'38 ]39 },40 server: {41 url: 'infinitypro.localhost'42 }43});44 45toolkit.extendTasks(gulp, /* Gulp task overrides. */);Lines 40-42 are key, where we tell Gulp WP Toolkit that we’re using a local site with a URL of infinitypro.localhost.
With these lines in place, you can run gulp serve to launch a new BrowserSync session and see your code changes update in the browser in real time.
Thanks for the Tutorial & Module Craig 🙂
I’ve got everything working based on the above, except BrowserSync, I just cannot get it to reload on changes. I have the same setup as above (kept module versions the same etc), obviously replacing url key with my own local project.
Any ideas?